Preface
A while ago, i decided to convert my home network to more “professional” gear. My existing setup had been performing great for years, but as line speeds continue to increase, and the number of connected devices seem to skyrocket, the network had gotten more and more sluggish, and the recent router hijacks just made me even more determined to get something that i have greater control over.
Years ago i ran my own router on a Soekris net4801 running pfSense, but line speeds eventually got faster than what the Soekris could keep up with, and i ended up on consumer hardware. I did run with my Time Capsule as my main router for 6 months or so, and while they perform great, i really don’t like the idea of my router containing all my backups, especially when i have no way of telling what goes on with that device. I ended up on a Cisco rv042g instead,
My regular internet line is a 50/50 Mbit fiber, and because my employer requires me to connect through a dedicated ADSL line, i have one of those as well. Searching for Dual-WAN routers narrowed the field. The Cisco had been great, but it bugged me that i could only set it to failover or load-balance. What i want is failover with some traffic going to the backup link. That narrowed the field quite a bit.
I ended up with two options, a “do it yourself” box with pfSense, or the new kid on the block, the EdgeRouter Lite which claims it can do 1 million pps and costs less than $100.
After reading raving reviews of the EdgeRouter, and realizing that the board i was going to run pfSense on was only capable of routing 85mb/sec and cost $235, i figured i’d give it a spin.
This is not your average consumer router though. The EdgeRouter runs Vyatta which is based of Debian Linux, but with a really powerful command line syntax for setting things up.
I searched the web for something similar to my setup, but couldn’t find anything readily available, so here is my attempt at documenting the setup process for myself, in the hope that others will find it useful.
I used this guide as inspiration for the basic setup.
Setting it up
In the following i will be setting up the EdgeRouter Lite for running a dual WAN / single LAN with WAN failover.
- eth0 is LAN
- eth1 is WAN1
- eth2 is WAN2 (failover)
login to the EdgeRouter (ERL) and enter configure mode
configure
Interfaces
Here we will setup the network Interfaces
eth0 => LAN
edit interfaces ethernet eth0
set description "LAN"
set address 192.168.1.1/24
top
eth1 => WAN1
edit interfaces ethernet eth1
set description "WAN1"
set address dhcp
top
eth2 => WAN2
edit interfaces ethernet eth2
set description "WAN2"
set address dhcp
top
Users
The ERL ships with a default user of ubnt/ubnt, which we will replace with our own user.
Create a new user, the plaintext password will be encrypted on commit!
edit system login user new_user
set full-name "username"
set authentication plaintext-password "password"
set level admin
top
commit
Now logout of the router, and login as your newly created user.
Delete the default ubnt user
delete system login user ubnt
DNS Forwarding
In the next section we’re going to setup a DHCP server, and we’ll need to setup DNS servers for that. The following sets up a standard DNS forwarding service. There’s a bug (not acknowledged by Ubiquiti) that causes the router to write the WAN DNS servers to /etc/resolv.conf - even if you setup system dns servers. So if you use OpenDNS or similar, make sure you check resolv.conf.
edit service dns forwarding
set cache-size 1000
set listen-on eth0
top
DHCP Server
edit service dhcp-server
set disabled false
set dynamic-dns-update enable true
top

edit service dhcp-server shared-network-name LAN
set authoritative disable
edit subnet 192.168.1.0/24
set default-router 192.168.1.1
set dns-server 192.168.69.1
set domain-name somewhere.dk
set lease 86400
set start 192.168.1.50 stop 192.168.69.250
top
WAN Masquerading
Next we setup masquerading, which means your inside IP’s masquerade as the public IP of the router. We need a masquerade rule for each WAN interface, other than the interface name they’re identical.
edit service nat rule 5000
set description WAN_MASQ
set log disable
set outbound-interface eth1
set protocol all
set type masquerade
top

edit service nat rule 5001
set description WAN_MASQ
set log disable
set outbound-interface eth2
set protocol all
set type masquerade
top
Basic Firewall
First we setup some basic settings like ip forwarding, connection tracking etc.
edit firewall
set all-ping enable
set broadcast-ping disable
set conntrack-expect-table-size 4096
set conntrack-hash-size 4096
set conntrack-table-size 32768
set conntrack-tcp-loose enable
set ipv6-receive-redirects disable
set ipv6-src-route disable
set ip-src-route disable
set log-martians enable
set receive-redirects disable
set send-redirects enable
set source-validation disable
set syn-cookies enable
top
Next we’ll create a basic firewall for WAN input.
edit firewall name WAN_IN
set description "Inbound WAN to (W)LAN"
set default-action drop

set rule 5000 action accept
set rule 5000 description "Allow Established/Related"
set rule 5000 log disable
set rule 5000 protocol all
set rule 5000 state established enable
set rule 5000 state invalid disable
set rule 5000 state new disable
set rule 5000 state related enable

set rule 5001 action drop
set rule 5001 description "Drop Invalid"
set rule 5001 log disable
set rule 5001 protocol all
set rule 5001 state established disable
set rule 5001 state invalid enable
set rule 5001 state new disable
set rule 5001 state related disable

top
Local Firewall
The local firewall is a firewall that is there to protect the router itself. It filters traffic destined directly for the router. It is similar to the firewall above, but implemented separately so that when we poke holes in the WAN_IN firewall, we don’t open up the router at the same time.
edit firewall name WAN_LOCAL
set description "Inbound WAN to Local Router"
set default-action drop

set rule 5000 action accept
set rule 5000 description "Allow Established/Related"
set rule 5000 log disable
set rule 5000 protocol all
set rule 5000 state established enable
set rule 5000 state invalid disable
set rule 5000 state new disable
set rule 5000 state related enable

set rule 5001 action drop
set rule 5001 description "Drop Invalid"
set rule 5001 log disable
set rule 5001 protocol all
set rule 5001 state established disable
set rule 5001 state invalid enable
set rule 5001 state new disable
set rule 5001 state related disable

top
Add firewall rules to interfaces
Next we apply the firewall rules to the WAN interfaces.
edit interfaces ethernet eth1 firewall
set in name WAN_IN
set local name WAN_LOCAL
top

edit interfaces ethernet eth2 firewall
set in name WAN_IN
set local name WAN_LOCAL
top
Basic system settings
set system host-name EdgeRouterLite
set system domain-name somewhere.dk

set system name-server 8.8.8.8
set system name-server 8.8.4.4

set system time-zone Europe/Copenhagen
Load Balancing
Load balancing on EdgeOS requires multiple things to be setup. First we configure the actual load-balancer with the interfaces to be balanced, along with a route-test to determine if the link is alive.
Add eth1 to the load balancer.
edit load-balance group lb-default interface eth1 route-test
set initial-delay 60
set interval 100
set type ping target ping.ubnt.com
top
Add eth2 to the load balancer.
edit load-balance group lb-default interface eth2
set failover-only
edit route-test
set initial-delay 60
set interval 100
set type ping target ping.ubnt.com
top
Next we create firewall rules for modifying the routing table for failover.
There’s a bug with Hairpin NAT and load balancing, so this is a little hack that forces inbound traffic to use the main routing table discussed here
edit firewall modify lb rule 1
set action modify
set destination group address-group ADDRv4_eth0
set modify table main
up
then to setting up the actual modification
edit rule 10
set action modify
set modify lb-group lb-default
top
Apply firewall rules to our LAN interface so that all outbound traffic is routed according to the rules we just setup.
edit interface ethernet eth0 firewall in
set modify lb
top
Hairpin NAT
Hairpin NAT allows you to reach your public IP’s from the inside network. Basically it converts your inside address to the external address, and then back to the internal address. The 1.4.x software has a new configuration option for automatically setting up firewall, nat and hairpin nat, but unfortunately it doesn’t work with multiple WANs (or LANs), so for now we’re stuck with the “old way”.
edit service nat rule 5002
set description "Hairpin_MASQ"
set destination address 192.168.1.0/24
set log disable
set outbound interface eth0
set protocol all
set source address 192.168.1.0/24
set type masquerade
top
Apply changes and save
commit
save
You now how a basic dual wan router working. I didn’t setup load balancing since one of my links is significantly slower than the other, which means the load balancing is actually a degradation of service in my case.
Wrapping up
I’ve been running with this router now for a few weeks, and i must say i’m very pleased.
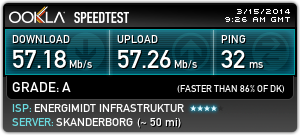
This is my (primary) WAN throughput with my old Cisco RV042g
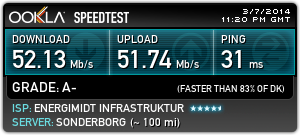
And here’s one of my current throughput on the same line with the EdgeRouter.